
I had been practicing my cakepop skills for a few weekends now, leading up to this order. They weren't going to be regular cake pops...no sir! These were going to be bumblebee-shaped, with wings, and antenna, and stripes! I had tried a few methods before settling for this variety. The difficult part was shaping them without them cracking. On my first couple tries, they kept cracking before I could dip them, and the crack would show through the chocolate as a clear dent. I found out the cracks were happening because the cake would expand as it went from a cold area (fridge) to warm area (my counter). So I realized I needed to put them into the fridge for just 2 minutes and then let them come back to room temperature before dipping them. Another issue was that the cakepop would fall off the stick and into the melted chocoalte (more truffles for me!). So it's always good to make a few extras!
The white wings are made out of fondant. The antenna are black sprinkles. The stripes and face were drawn on with an edible marker. As you can tell, quite time consuming!

The above was a test run done a few weeks ago - you can tell some of them had expanded and cracked right through the chocolate. You can also see I experimented with wing shapes. But my brother said the folded wings looked like mouse ears and that the flat ones were more animated and child-like. These were a pale yellow - I blame this on the candy melts I got from the local bulk store. Adding yellow coloring didn't help. I then tried the Wilton melts, they have a more prominent yellow color..
The following were the cakepops I made for the birthday party. As you can see, they all survived. None of them cracked, they all stayed on their sticks, and they're a brighter yellow!


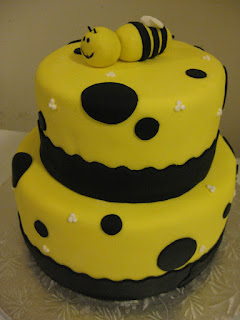
The cake was fun to do. The top tier was 6", two layers of chocolate. The bottom tier was 9" and a sandwich of chocolate-vanilla-chocolate. I tried a new buttercream recipe - that of the cake boss himself, Buddy Valastro! A mix of shortening and butter. I found it to be very smooth and tasty, and easy to spread and decorate with.
In the past, I've had trouble getting nice dark colors. They usually turned out to be pastel-like. This time, I mixed the yellow fondant ahead of time and found it got darker the longer I let it sit. Black fondant is another story. I was mixing the fondant for a good 20 minutes. Then went to rinse my hands and found it had dyed my hands RED! In the end it stayed a dark grey and couldn't get it to be jet black, so I opted for Wilton's black fondant for the dots and ribbon border. I then piped a few white dots just because white was also part of the color theme. This was the end result:


The whole lot, ready to be devoured!

By the way, my hands are back to their normal color..took a lot of scrubbing!! :]

No comments:
Post a Comment