Pages

Monday, March 24, 2014

Woodland Creatures

Reena is Three!

Her party was a Woodlands theme, and her mom wanted me to make an ombre rosette cake. I have seen these on Pinterest and have been dying to try it out!

This was a 8" round vanilla cake, but was really tall and had 4 layers of cake inside! It was a little tricky getting the right shades of brown. At first, I was going to make two-toned rosettes (white/brown) and attempted to do that for the bottom darker rosettes. I didn't like how they turned out, so continued to do the rest of the cake with just single-toned rosettes.


Ariel View

Reena's mom (aka Sophie's mom) is an awesome party decorator - look what she did!!
(photos courtesy of their mom, Nivetha Yogeswaran)


Sunday, February 23, 2014

Boys and their cars!

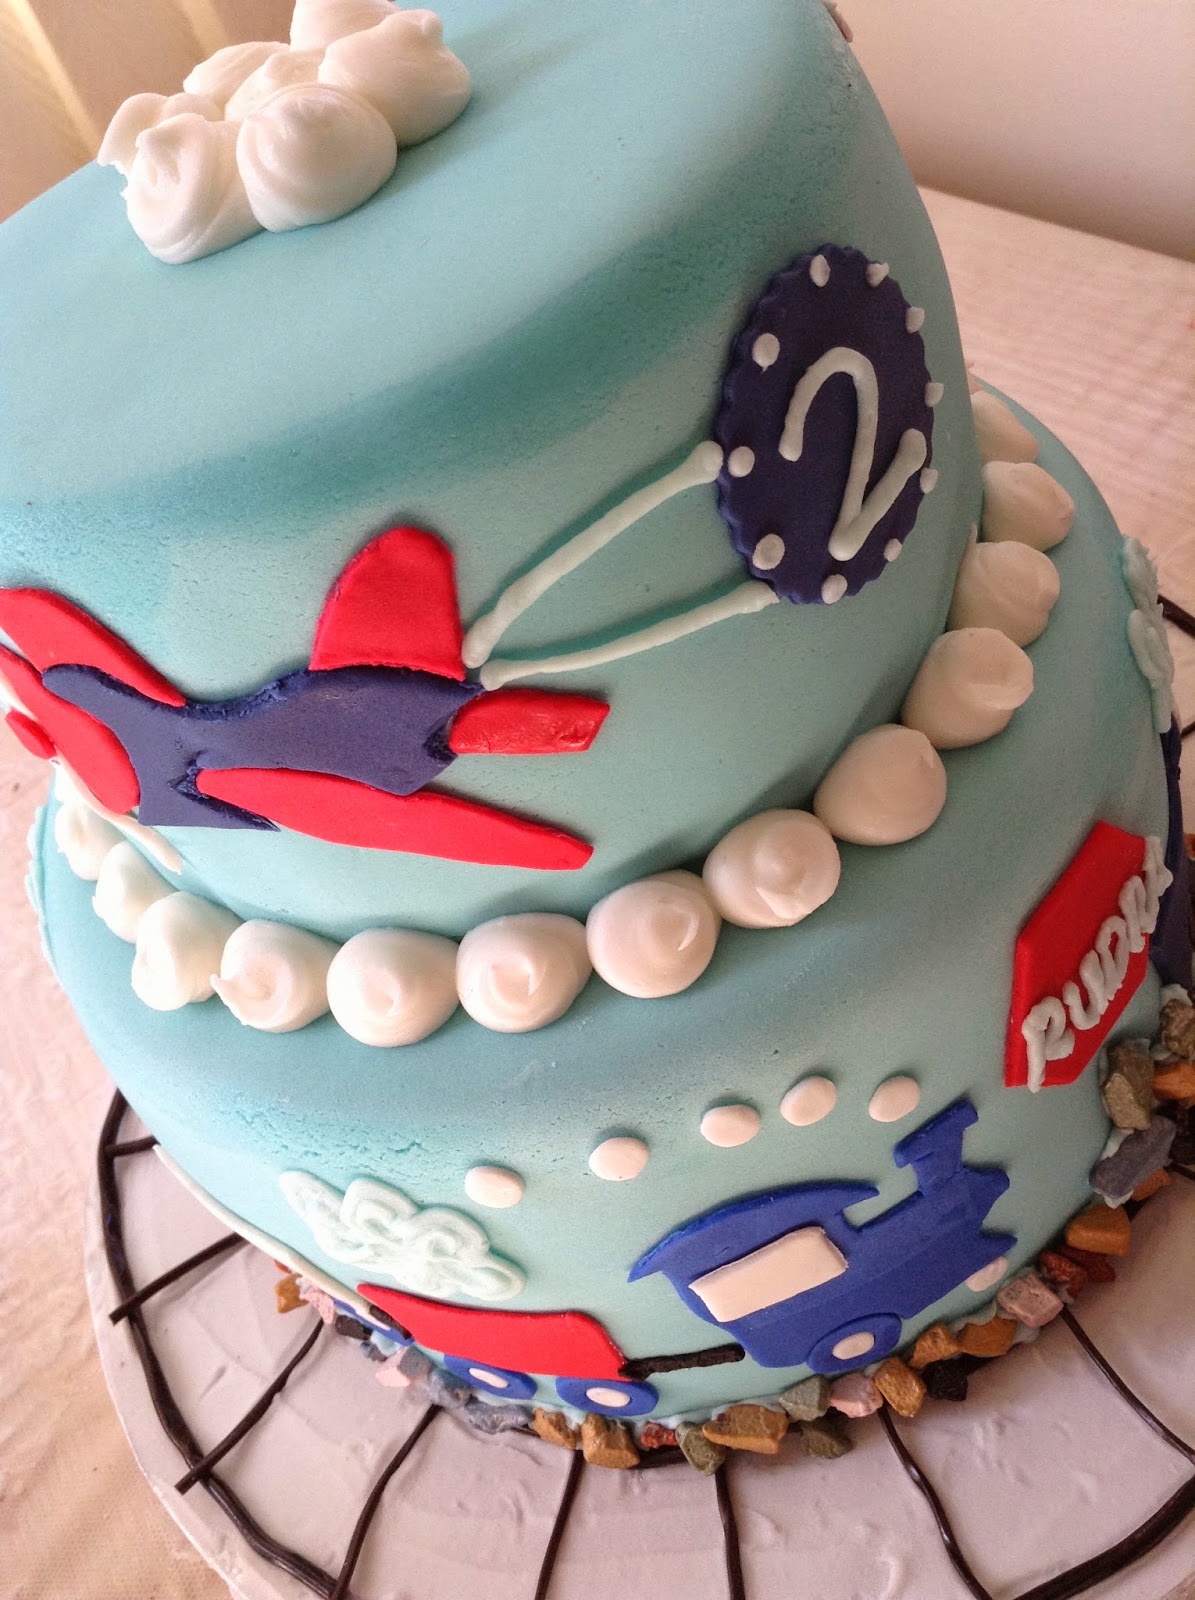
Another friend's son is turning two, and also loves cars! She saw the cake I made for Xavier (click here) and wanted something similar, except all in fondant.

I made a 2-tier cake, all vanilla, the top 6" and the bottom 8". I covered both in blue fondant and stacked them. The birthday theme was red, blue, and white so I stuck to this as much as I could.

The top tier resembled the air, so I cut out pieces of colored fondant to make planes, one pulling a banner saying "2". The other sides of the top tier had helicopters.

The bottom tier resembled the ground, so I lined the bottom of it with candy pebbled, and made fondant cars. As the mother requested, I made a stop sign with her son's name in it.

I wanted to make train tracks running around the edge of the cake, so I used shoelace licorice to create tracks.


Ariel View
I piped clouds on top, since this is where the candles were going

Saturday, February 15, 2014

Happy Valentine's Day!

I made these for work: red velvet cake balls and mini cupcakes!
The mini cupcakes are topped with a swirl of cream cheese icing and a candy heart.
The cake balls were dipped into melted white chocolate and drizzled with pink icing.


Since I have many of my coworkers on Facebook, I posted the picture below with a description reading "for those of you who work with me, these will be waiting for you in the morning!" :)


I also made chocolate-covered strawberries for lunchtime dessert, because who doesn't love fruit DIPPED in chocolate?? The things I do for the people I love...yup, i'm looking at you!! teehee <3

Saturday, January 11, 2014

Planes Trains & Automobiles

Xavier is turning two, and of course like most little boys, is in love with all things cars!! So I made him this 8" round cake covered in buttercream icing and adorned with fondant automobiles.
Each one had multiple pieces to it (i.e. wings, wheels, windows), so I had to cut out different parts of colored rolled fondant before I could put the pieces together on the cake.

Top of the cake

Xavier's Train
I piped on the letters

Plane

Taxi


Fire Truck
I piped on the black ladder

Pickup Truck

Sunday, December 22, 2013

Sophie is One!

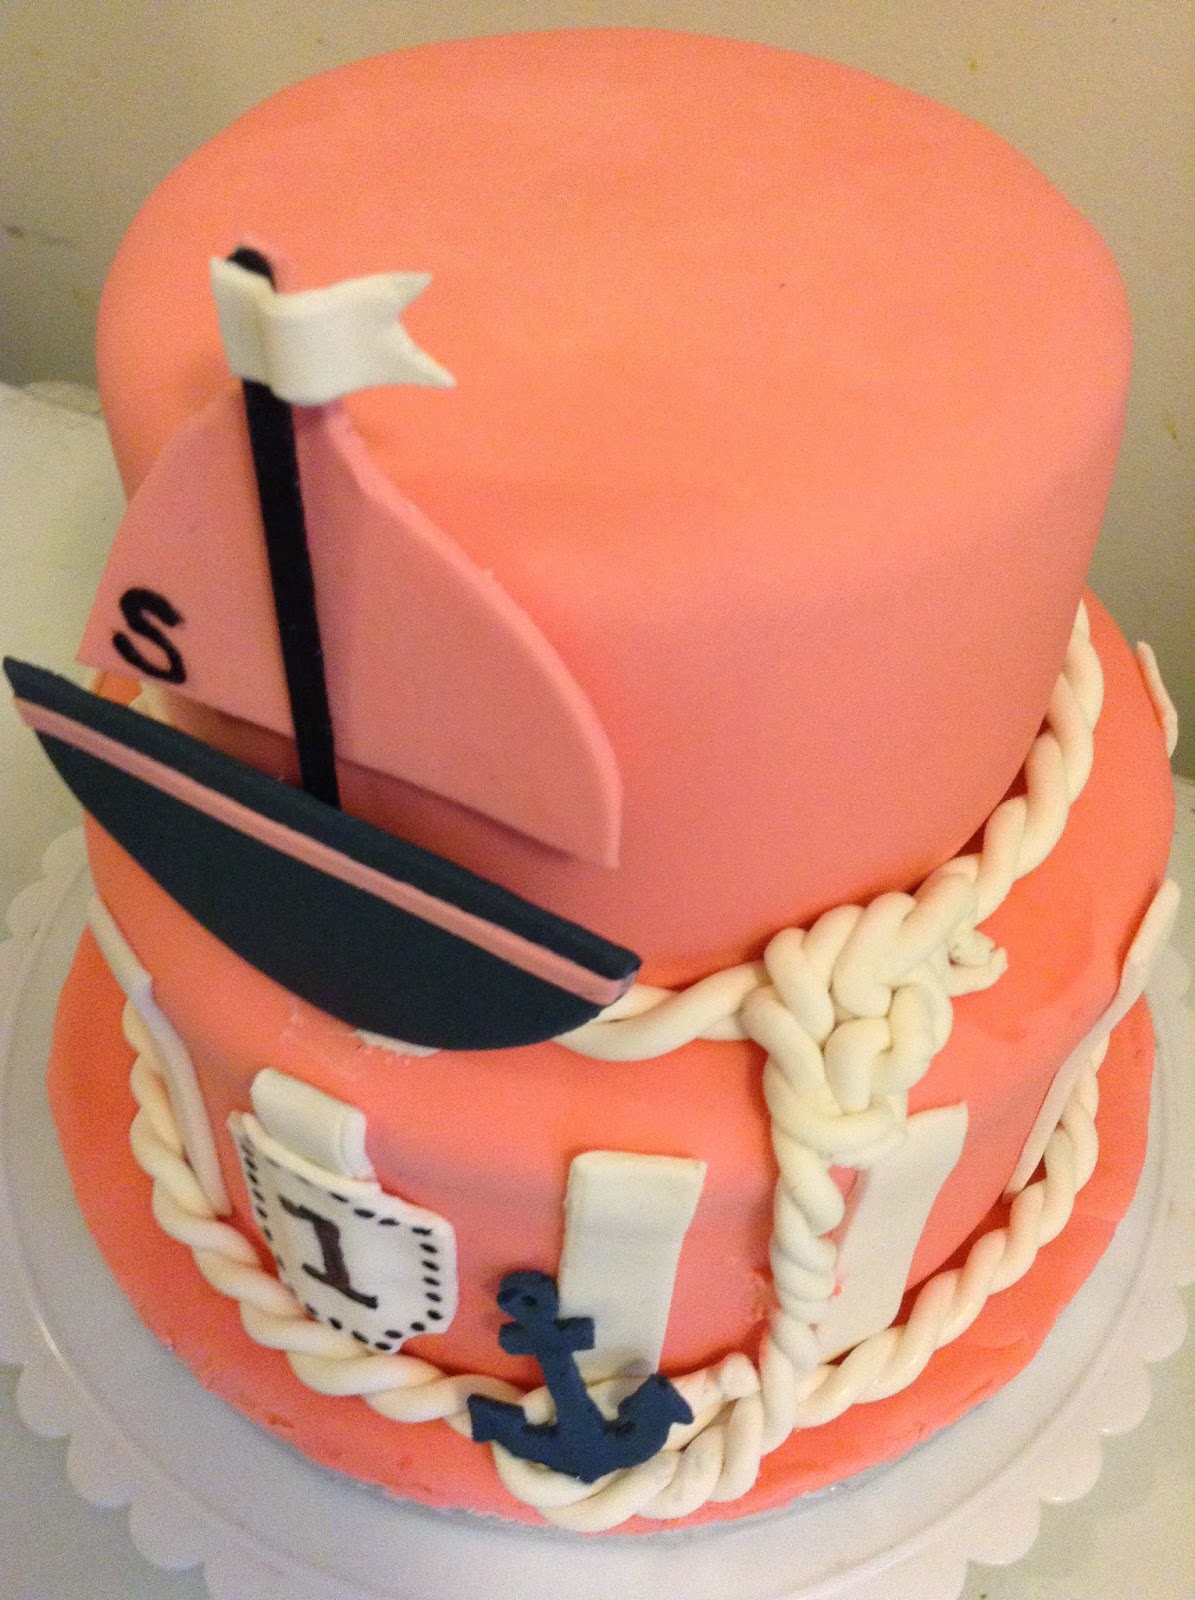
You might remember the baby shower cake I made for Sophie last year. (If not, click here.) Well, now Sophie is 1 and celebrating her birthday in grand sailor fashion.  The color scheme was pink, navy blue, and white, and there were lots to do!

First, I made marshmallow pops. Ahead of time, I took mint lifesaver candy and painted them with edible ink to resemble life preservers. Then I took marshmallows and stuck them into one end of a decorative straw. I dipped half the marshmallow lot into melted pink chocolate, and the other half of the lot into melted navy blue chocolate (this was white chocolate wafers melted down using the double boiler method, and then added food coloring afterwards). Then I added sprinkles and the lifesaver candy on top before the chocolate coating could fully dry.
I like how these turned out and would opt to do these again in the future!


Second, I made vanilla cupcakes topped with a pink buttercream swirl and white sprinkles. They turned out more coral than pink but with the cupcake wrapper and sprinkles, it still looked good.


Third, and possibly most difficult of all, I had to do a cake! I was excited about this one though, because I knew ahead of time what I was going to do. Sophie's mom had shown me a picture ahead of time of what she wanted the cake to look like. I made the bottom tier (8" round) vanilla , and the top tier (6" round) chocolate. I covered them both in pink fondant .. it was difficult this time as the fondant was heavy and started to rip as soon as I put it on the cake.

While decorating, outside the weather was turning bad (it would turn out to be the weekend of freezing rain, city-wide power outages, and lots of downed trees!). However, with the ripping fondant and softening buttercream on the cake, I had to go out to the store and get more fondant. So yes I drove in freezing rain - lesson learned: stock up on fondant!! :p

So back to the cake - I was able to finally get the cakes covered and stacked. I decorated the bottom tier with vertical stripes of white fondant. Then I took two strips of white fondant, rolled them out into long worm-like strings, and then carefully intertwined them making sure they didn't tear. This makes the rope look. I draped these at the bottom of each tier. I cut out a piece of fondant, and with navy blue edible ink, I painted on the number "1" and stuck this to the front of the cake.

Ahead of time, I had created a navy blue anchor out of gumpaste. This had since dried and hardened so I placed it at the bottom of the cake, resting along the ropes. I had also made parts of the sailboat and now put them together on the top tier.  The mast of the sailboat is actually a thin popsicle stick (from the craft store) used for support, and painted in edible navy blue ink. The sailboat was stuck onto the cake using buttercream icing.


Update:
Sophie's mom has a knack for decorating and was featured in a blog (along with my cake)!
http://thesweetpeachpaperie.com/sweet-customers-sophie-is-one/


Saturday, November 30, 2013

One Direction is the Story of My Life!!

One Direction just released another album, so of course with a preteen birthday coming up...she wants a One Direction cake!! I'm not sure how much more of these guys I can take, but I love this kid so I will oblige! :) I'm kidding, I like some of their songs, its been growing on me. Especially their new one, Story of My Life.

This chocolate cake is 8" round, and has 2-layers in it. I covered it in rolled black fondant. It wasn't as bad as I thought it would be, and went on well on the first try. Yesterday, I cut out the letters to "one direction" as well as all the band members' names and left them overnight to dry and harden. I put the boys' names around the sides, separated by a white fondant heart. I also lined the bottom of the cake with a white fondant ribbon.

The top of the cake was trickier since I had to do to logo! I cut out "1D" from rolled fondant, and stuck it to the cake using a dab of water. I used black edible ink and a thin stiff paintbrush to draw in the markings (just like the official logo has). Lastly, I piped "Happy Birthday Pragathi" right onto the cakeboard. I took it to the party with the lazy Susan turntable; this way you could spin it and see all the names on the sides.


Sunday, November 3, 2013

Happy Diwali!

Today in my culture, it's Diwali - the Festival of Lights. After lighting up the outside of the family home with candles and lamps (as per custom!), I decided to make a cheesecake! Ok, I had a craving. I just had to indulge!

I had a box of Smarties and since I was already in the decorating mood, I decided to decorate my cheesecake. YUM!! Happy Diwali! :)


Sunday, October 27, 2013

Sports Cookies, Hoboken Style!

Buddy Valastro of Cake Boss (and my idol!) had an online contest of who could bake and decorate the best sports cookies. He makes them in his book, so I followed his sugar cookie recipe. I made tennis ball, baseball, and basketball cookies and attempted a football cookie. I cut out a piece of colored rolled fondant, used buttercream icing to help it stick to the cookie, and piped the details on.
My favorite is the baseball one, because I could pipe the seams on in different ways (two-seam or four-seam baseballs). I didn't end up winning but they were fun to make. And even yummier to eat!

Saturday, September 21, 2013

Going Simple

My uncle had a milestone birthday and my aunt asked me to make a cake for him. Since there were going to be more than 1 cake anyway, and lots of desert, she asked for it to be really simple.

I'm working on my border piping skills. Here I did a shell border. I wish I had a larger start tip so that I can make it bigger.


It turned out to be simpler than I would've liked. But everyone really liked how it tasted (it was a regular vanilla cake, but sometimes going simple like that makes people nostalgic, and that's the best kind of cake!) so it worked out in the end.

Tuesday, August 27, 2013

Red Velvets

I made these cupcakes for the workplace to help celebrate the upcoming wedding of two coworkers. What I did different was sprinkle the top with a bit of cake crumbles so that you could see what type of cake you were eating!


Saturday, July 13, 2013

The Behemoth

A few months ago, I received a request for a 1st birthday cake that had to feed a lot of people! It had to be a 3-tier tall cake, each tier having 3-4 layers within it. The bottom tier was 10", the middle tier was 8", and the top tier was 6". This would be by far the biggest cake I'd ever made so far! I was given a picture of how the tiers were to look like. So I tried my best to recreate that, but at the same time didn't want to copy every single detail.

The bottom tier was about 5" tall, and was covered in white buttercream icing. I gave it a blue Chevron fondant pattern.

The middle tier was about 4" tall, and the client wanted this covered in yellow icing with white dots. The dots were made by rolling out white fondant, and using the ends of a Wilton tip to cut out perfect circles.

The top tier was about 5" tall, and again covered in white icing. They wanted the letter V on a fondant plaque, since that was the birthday girl's initial. I encircled the middle of this tier with a blue fondant ribbon overlapping a yellow one. I used Wilton silicone molds to create pink and yellow fondant rose buttons to decorate the bottom of this tier.

They requested butterflies adorn the cake. I didn't want it to look too busy, so I just made a few. I rolled out purple gumpaste, pressed a butterfly stencil into it, cut it out, bent it in a way that looks like the butterfly is resting on a flower, and let it dry overnight. I then dusted it carefully with purple pearl dust (edible!) so that the details of the wings from the stencil would show. Each butterfly was carefully placed onto a tier.

Thee also wanted a fondant "1" at the top of the cake. This was also done ahead of time using gumpaste and toothpicks so that it could be stuck into the top and then easily removed once the cake was cut into. She also requested a flower on top, so I layered fondant rose petals (dried ahead of time) on top of each other.

The bottom of each tier was then piped with white dots to give it a completed look.

This one weighed a lot, and took two people to carry it to the car!


Tuesday, July 9, 2013

Its a bird! Its a plane! No, its...

SUPERMAN!!!

Yet another birthday, this time for a grown-up comic book superhero fan. I really liked the Frozen Buttercream Transfer done with the Hello Kitty cake and wanted to try it again, this time to try and perfect it.

I had made regular vanilla cupcakes, and topped it with a blue buttercream swirl. Yes, I used Spiderman cupcake wrappers since I couldn't find Superman ones anywhere!! (Is it bad to mix DC Comics with Marvel??)

I piped out the Superman logo backwards onto wax paper, and froze it overnight. The next morning, I carefully peeled off the paper and placed the logo carefully onto each cupcake. A few of them broke or weren't fully frozen yet, which was expected. I had made extras just in case!

The longer they sat on the cupcake, the more they started to melt and wilt onto the blue icing below. None of them broke off or bled onto the blue icing though, which was good news. In the end, I was happy with how these turned out. I think because these logos were smaller than the Hello Kitty one, it worked out better.


Saturday, June 15, 2013

Damask

I've seen the damask trend, and have been wanting to try it. Now is my chance! This simple vanilla birthday cake was 8" round. I hadn't tried these types of patterns before, so I tested out my swirls on a sheet of wax paper first. Since it was being piped onto white buttercream icing, it couldn't be easily removed if I made a mistake, and would've smudged! Eventually, I just went with it and started piping all around the cake. For it being my first time piping like this, I think it turned out pretty decent.


Saturday, May 25, 2013

Breakfast At Tiffany's

The theme for a friend's bridal shower was Breakfast At Tiffany's. Her bridesmaids requested 24 regular cupcakes, 50 mini cupcakes, and a two-tier gift box cake.

The regular cupcakes were red velvet (bride's favorite), iced with a Tiffany Blue buttercream icing swirl, and topped with a white fondant bow. Each bow is handmade (that's why they look a little bit different from each other!).


A close-up of the cupcake

Each of the mini cupcakes (also red velvet) were easier to make, since they just required a dollop of Tiffany Blue icing. I found it to be more elegant to pipe out the bow with white icing.


The cake was supposed to be two-tier, but wasn't going to feed that many people. I suggested the top tier be made of Styrofoam, and the bottom tier be edible. The bottom tier was a 9" square vanilla cake, with a 5" square Styrofoam dummy on top. I covered the top and bottom tiers in Tiffany Blue icing, and laced it with white fondant ribbon to resemble gift wrap. I made the top bow from scratch using half fondant / half gumpaste, and piped the edge of the bottom tier with white pearl-like buttercream  dots, hoping this would add to the elegance factor.

Top View, the finished bow

I hand-wrote the sign on a piece of hardened fondant (cut with a scalloped cookie cutter and left to dry overnight), using edible black ink and a thin stiff paintbrush. I thought this would give it a neater, finished look rather than piping out the phrase with black icing.

Saturday, May 18, 2013

Adventure Time!

A friend requested Adventure Time themed cupcakes and cake pops for her boyfriend's birthday. He really likes angel food cake so that's what I made. It turned out really puffy but still soft on the inside.

The cupcake toppers were made on edible paper and backed with a piece of rolled fondant.


The Bee that is sometimes seen in the show resembles the cakepops I had made in March 2012 for a bumblebee themed party.  So I replicated them for this party!